How do you force snap to grid in Visio?
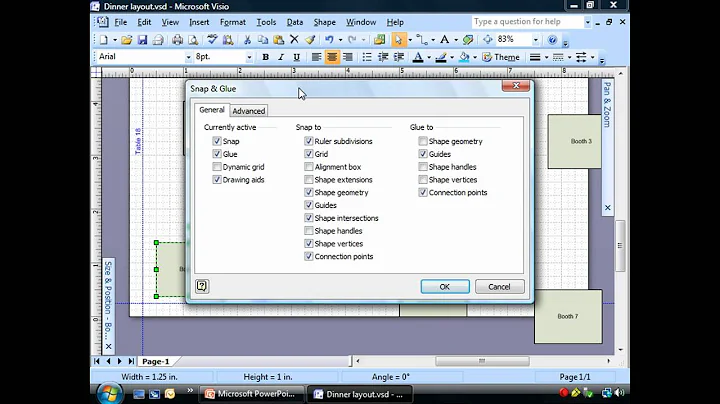
On the View tab, in the Visual Aids group, click the dialog box launcher. On the General tab, under Currently active, clear the Snap check box to deactivate snap, or select Snap to activate snap. Under Snap to, select the drawing elements that you want shapes to snap into alignment with, and then click OK.
Turn the dynamic grid on or off
On the View tab, in the Visual Aids group, select the Dynamic Grid check box to turn it on or clear the check box to turn it off.
Snapping just moves something, implying precision location. So, if you snap a connector to a shape, then move the shape, the connector stays put. If you glue a connector to a shape, then it creates a "connection" to that shape. Now, move the shape and the connector will follow.
Select a chart, picture, or object in the document. On the right end of the ribbon, select Format > Align > Grid Settings. The Grid and Guides dialog box appears. Positions an object to the closest intersection of the grid even when the grid is not visible.
- Choose Edit > Preferences > Guides & Grid.
- Under the Guides or Grids area: ...
- For Gridline Every, enter a number value, and then choose the unit of measurement to define the spacing of major grid lines.
- 1 Launch the Camera app.
- 2 Tap on Settings.
- 3 Toggle on Grid lines.
- 4 You will then be able to use the Grid lines to help proportion your picture.
A grid system is a library of HTML/CSS components that let you structure a website easily. Grid systems help you create responsive websites that have consistent designs and ensure cross-browser support.
Turn snap to grid on or off
Select View > Guides > Snap to Grid.
You can open the Grid and Snap window from the menu (Edit > Grid and Snap Settings) or by using the grid visibility drop-down menu: From the grid visibility drop-down menu (A), click the overflow menu icon (B).
Use your keyboard to Snap in Windows: Press and hold the Windows Logo Key + Arrow to Snap the app you are on. You can change positions of the snap using your keyboard arrows.
How do I stop Visio connectors from snapping?
Go to File>Options to clear the Enable AutoConnect checkbox. For more information, you could refer to Add connectors between Visio shapes. Then go to View, click on dialog launcher of Visual Aids. On the General tab, clear the Snap and Glue checkboxes.
While VSD files use LZW-like lossless compression, VDX is not compressed. Hence, a VDX file typically takes up 3 to 5 times more storage. VSDX and VSDM files use the same compression as Zip files. Visio also supports saving files in SVG files, other diagramming files and images.
Excel will hide gridlines if the background is white. If the cells have no fill, gridlines will be visible.
Select View > Guides > Snap to Grid.
Note: Snap mode can be turned on and off with the F9 key.
The grid helps you align objects and visualize the distances between them. The grid is not plotted. Grid Snap restricts the movement of the crosshairs to intervals that you define. When Snap is turned on, the cursor seems to adhere, or "snap," to an invisible rectangular grid when you create or modify objects.
In the View menu, make sure that 'Snap to Grid' is unchecked (SHIFT-CMD-'). Toggle the visibility of the Grid with CMD-'. The size of the Grid can be adjusted in the Preferences panel.
- Tap the Camera button 🔘 to take a photo Snap.
- Press and hold the Camera button 🔘 to create a video Snap.
- Tap 🔄 to switch between the selfie and rear-facing Camera. Pro Tip 💡 You can also double-tap the screen to switch cameras!
- Tap ⚡️ to enable or disable flash.
You can try to disable the Align icons to grid option: Right click on your desktop (Shift+F10), click/tap on View, and click/tap on Align icons to grid to uncheck it.
On the View tab, in the Show group, click the Ruler & Grid Dialog Box Launcher. Under Grid origin, enter x (horizontal) and y (vertical) coordinates for the point from which you want the grid to originate, and then click OK.
How do I extend the grid in Visio?
Open a drawing in Visio. On the File menu, click Page Setup. In the Page Setup dialog box, click the Page Size tab. Click Custom Size, and then enter the page dimensions that you want.
Grid Modes affect the movement and placement of audio and MIDI clips, the way commands such as Copy and Paste work, and also how the edit tools operate (trim, selector, grabber, etc).
The Data Grid ( GridControl ) is a container of Views, which display data from a bound list, table, or collection in a specific format. If you bind the grid to a simple list, table, or collection, a single View is required to display this data. To choose the data display format, set the GridControl.
Let us not get confused with GridView and GridLayout to be the same. GridView simply gives us a two-dimensional view to display the items on the screen, under ViewGroup. On the other hand, GridLayout is a layout manager that arranges the views in a grid.
SNAP_ DATA: /var/snap/<snap name>/<revision number> This location it is also used to store data, mostly information utilised by background application and services, for logging, and other tasks that require persistence between snap launches.
The Grid function can be toggled off and on with the F7 key, and the Snap function can be toggled with the F9 key.
The Grid Snap function (Alt+S) assists in the precise graphic alignment of elements, even at low zoom levels.
Snap mode simply locks the crosshairs movement to a predefined increment. Along with Snap mode, you can also display a visual grid on the screen. The Grid Mode button toggles the display grid on and off. The grid is simply a visual display; it does not print and does not control the cursor movement.
If you can't see the grid, go to View > Show > Grid. Make sure there is a check next to Grid. Once your grid is visible, you can enable Snap to Grid by going to View > Snap To > Grid. Again, a checkmark to the left of Grid ensures it is enabled.
To set grid and snap settings: On the main toolbar, click Snaps Toggle to turn on the Snaps feature. Right-click the same button to open the Grid and Snap Settings dialog. Alternatively, choose Tools menu (or Scene menu if using the Alt menu system) Grids And Snaps Grid And Snap Settings.
