Turn off snap to grid visio?
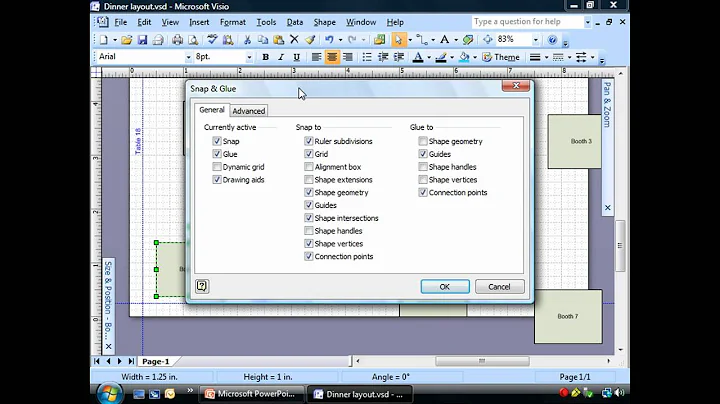
On the View tab, in the Visual Aids group, click the dialog box launcher. On the General tab, under Currently active, clear the Snap check box to deactivate snap, or select Snap to activate snap. Under Snap to, select the drawing elements that you want shapes to snap into alignment with, and then click OK.
Go to File>Options to clear the Enable AutoConnect checkbox. For more information, you could refer to Add connectors between Visio shapes. Then go to View, click on dialog launcher of Visual Aids. On the General tab, clear the Snap and Glue checkboxes.
Turn snap to grid on or off
Select View > Guides > Snap to Grid.
Snapping just moves something, implying precision location. So, if you snap a connector to a shape, then move the shape, the connector stays put. If you glue a connector to a shape, then it creates a "connection" to that shape. Now, move the shape and the connector will follow.
The dynamic grid is a set of alignment, spacing, and resizing guides that appear when you move a shape near another shape, or near the margin of a page or container. The shape gently “snaps” into an aligned position along the guides.
On the Developer tab, in the Shape Design group, click Protection. Select the shape attributes that you want to lock, or clear the check boxes for the attributes you want to unlock, and then click OK.
Note: Snap mode can be turned on and off with the F9 key.
Snap mode simply locks the crosshairs movement to a predefined increment. Along with Snap mode, you can also display a visual grid on the screen. The Grid Mode button toggles the display grid on and off. The grid is simply a visual display; it does not print and does not control the cursor movement.
- Go to Settings (Windows Key + I)
- Go to System.
- Go to Multitasking.
- Turn off the Snap windows toggle.
- Select the connector or connectors you want to change.
- Select the Shape tab of the ribbon, then select Connector Style.
- From the drop-down menu, select the option you want.
How do I keep connectors straight in Visio?
Select the Design tab, then select the Connectors dropdown menu in the Layout group. Then select Right Angle, Straight Lines or Curved Lines. Alternatively, select the File tab, select Print, select Page Setup, select the Layout and Routing tab, and then in the Appearance list, select Straight or Curved.
Turn off the snap-to options
On the right end of the ribbon, select Format > Align > Grid Settings. The Grid and Guides dialog box appears. To turn off the Snap objects to grid when the gridlines are not displayed or Snap objects to other objects settings, clear the respective box.
To set grid and snap settings: On the main toolbar, click Snaps Toggle to turn on the Snaps feature. Right-click the same button to open the Grid and Snap Settings dialog. Alternatively, choose Tools menu (or Scene menu if using the Alt menu system) Grids And Snaps Grid And Snap Settings.
Snap to Grid. The Grid Snap function (Alt+S) assists in the precise graphic alignment of elements, even at low zoom levels.
Turn snap to grid" on or off
On the View tab of the ribbon, select or clear the Snap to Grid checkbox.
A lightweight version of Visio is now included with all commercial SKU of Microsoft 365 and is known as Visio in Microsoft 365. It has two other subscription based SKUs. Visio Plan 1 includes the Visio web app whereas Visio Plan 2 provides access to both the web app as well as the Desktop application.
- On the Design tab, click the Page Setup Dialog Box Launcher.
- On the Print Setup tab, under Print, select the Gridlines check box.
- Click OK.
- Print the drawing.
A grid system is a library of HTML/CSS components that let you structure a website easily. Grid systems help you create responsive websites that have consistent designs and ensure cross-browser support.
- On the Design tab, in the Page Setup group, click the Page Setup Dialog Box Launcher.
- Click the Page Properties tab. In the Measurement Units list, select the units you want, and then click OK.
To delete a swimlane, click its label bar so that a grey highlight appears around the swimlane, then press Delete. Deleting a swimlane also deletes the shapes it contains.
How do I change the shape master in Visio?
Right-click the shape, select Edit Master > Edit Master Shape, and make changes to the shape. Select Close Window. Select Yes.
In the Editing group, click Layers, and then select Layer Properties again. In the Layer Properties dialog box, select the layer you want to delete, and then click Remove. Tip: To delete all unused layers, in the Layer Properties dialog box, check Remove unreferenced layers, and then click OK.
If snapping is stopping you from positioning your image elements exactly where you want them, you can toggle snapping on and off using the keyboard shortcut Command + Shift + ; or use Ctrl + Shift + ; if you're using Photoshop on a PC.
Figure 4.1: The grid status bar toggle. This option toggles the visibility of the grid lines in the drawing area. You can also use the F7 function key to toggle its visibility.
The function key F9 toggles snap mode.
You can turn the grid on and off either by double-clicking the Grid icon at the bottom of the screen or by pressing the F7 key on the keyboard. Turn Snap on and off by double-clicking the Snap icon at the bottom of the screen or by pressing the F9 key on the keyboard.
You can remove the grid altogether. Then tokens will not snap. If you still need a visible grid though, you would need to have one as part of the map image, or create a transparent grid overlay for the map layer (a separate png). To temporarily ignore grid snap, hold down the Alt/Opt key when dragging.
- Customize a connector the way you want to save it. ...
- In the Shapes pane, click More Shapes, point to My Shapes, and then click Favorites.
- Right-click the Favorites title bar, and then click Edit Stencil.
- Drag your custom connector to the Favorites stencil.
On the Home tab, in the Editing group, click Select, and then click Select All. On the Home tab, in the Editing group, click Select, and then click Select by Type. In the Select by Type dialog box, check the type of object that you want to select, such as shapes, connectors, or containers, and then click OK.
The Auto Align & Space button is located on the Home tab, in the Arrange group. This tool is designed to leave your shapes as close as possible to their current positions, but aligned with each other and evenly spaced. Select the shapes you want to align and space, or click outside the diagram to remove any selection.
Why can't I draw a straight line in Visio?
You can draw straight lines with the Line tool, normally at any angle that you choose. However, if you hold the Shift key while using the Line tool, you can only draw lines at multiples of 45 degrees.
Hold down the Shift key when using the Connector tool. This will constrain the connector to horizontal, vertical and 45-degree lines.
There are two main types of connections in Visio: dynamic and point. What differentiates these two connections is whether or not a connector remains glued to a specific connection point when you move the attached shape.
- Select the connector.
- In the Style tab of the format panel, select the middle or the right drop down list on the second row, then select None at the top of the lists. This will remove the arrow heads pointing towards the source and target shapes.
Snapchat's camera offers a “Grid” tool that will place a grid on the camera screen that users can use to line up their shots. For instance, a user can use the grid to ensure the horizon will be level in photo of the ocean. Our guide will show you how to take Snaps using the Grid tool in the Snapchat mobile application.
You can turn the grid on and off either by double-clicking the Grid icon at the bottom of the screen or by pressing the F7 key on the keyboard. Turn Snap on and off by double-clicking the Snap icon at the bottom of the screen or by pressing the F9 key on the keyboard.
Snap mode simply locks the crosshairs movement to a predefined increment. Along with Snap mode, you can also display a visual grid on the screen. The Grid Mode button toggles the display grid on and off. The grid is simply a visual display; it does not print and does not control the cursor movement.
Right-click on your Desktop and click on View. Check or uncheck Align icons to grid. Try moving your Desktop icons to see which setting you prefer.
You can remove the grid altogether. Then tokens will not snap. If you still need a visible grid though, you would need to have one as part of the map image, or create a transparent grid overlay for the map layer (a separate png). To temporarily ignore grid snap, hold down the Alt/Opt key when dragging.
